Communication
Communication is an integral component of collaborative work whether the collaboration be a paper or a software project. Good communication is the difference between a successful collaboration and a disaster.
In software development there are multiple layers of communication (this is less true for papers, though the fewer layers are arguably richer):
- The instructions to the machine on the desired behaviour - the code.
- Comments adjacent to and within the code explaining the intention where it’s not otherwise clear.
- Documentation for libraries and executables.
- File naming and filesystem layout.
- Bug reports/issues/feature requests/planning proposals.
- Commit messages or other explanation of code changes.
The final part of the workshop will explore the last of these, describing the intentions behind code changes and communicating between collaborators to merge changes into the main code base.
The task for this part of the workshop is to make a change to a public repository.
Sharing or Integrating
The basic model of data storage for git is a directed acyclic graph of objects. This basic model has, layered on top of it, local and network stores for the data. These can be used to construct a variety of network-based structures for working on shared projects, or workflows.
Two commonly used workflows are
- a single shared repository that all the collaborators on the project can alter, and
- a single blessed repository that a single ‘owner’ accepts changes made to collaborators' publicly visible repositories.
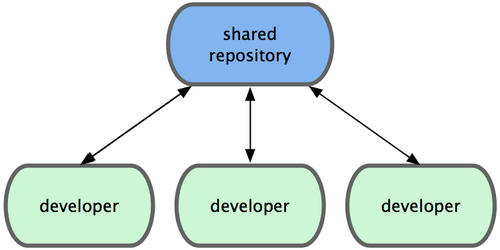
In the the shared repository model, one central hub, or repository, can accept code, and everyone synchronizes their work to it. A number of developers are nodes — consumers of that hub — and synchronize to that one place.
The second approach still maintains a centralised repository, the blessed repository.
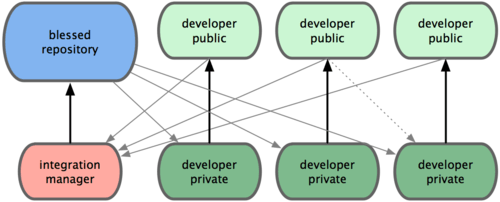
However, in the blessed repository case, each collaborator works on their private repository,
and makes the work visible publically via another, public repository that they own.
Collaborators keep their repositories up to date with the blessed repository by using git pull or git fetch.
In practice most projects hosted on GitHub probably use a mixture of these two models; the Gonum project used a shared repository model for members of the organisation and a blessed repository that any member can integrate work from external contributors into.
GitHub forks
In order to add the social coding layers that GitHub provides, GitHub allows a user to make a copy of a repository that that user can make modifications to. This is called forking (and is an abuse of the term as it is generally understood, but we will continue with it here - just understand that a github fork is not necessarily a fork in the broader sense). Navigate to the git workshop repository here and click the “Fork” button at the top right of the window. This will bring up a dialogue asking where you want to put the copy if you have write access to more than one set of repositories, otherwise it will make a copy and take you to the front page of that copy.
Q: How can someone find out where a fork has originally come from?
Cloning, pulling and fetching code
As mentioned above, git stores its data locally to represent the history of the project, but it also provides tools for accessing repositories at remote network-connected locations.
Just as scp, sftp, curl and other network tools can be used to transfer data between machines, git can be used to transfer repository data between machines.
To make a copy, or clone, of a remote repository, the clone subcommand is used.
Clone the git workshop git_workshop repository that you have forked:
$ git clone git@github.com:<githubusername>/git_workshop.git
Replace the <githubusername> text with your GitHub username.
This will have placed a copy of the upstream git_workshop repository at your current location (read man git-clone to see how to change this behaviour).
Note that you can get the link for any GitHub-hosted repository from the green “Clone or download” button to the right of the front page of the project; this is available on all repositories that you can see, you do not need to be the owner.
Make a change to the line of the PARTICIPANTS.md file with your workshop ID number adding anything you want to that line.
Once you have made the desired change to the PARTICIPANTS.md file, checkout a new branch with a meaningful name, stage the change with git add and commit it with git commit giving a meaningful commit message.
Commit messages
Just as comments in code indicate the intention behind the code or explain difficult, unusual or unexpected procedures, commit messages explain the reasons behind changes, particularly if the change is unexpected without inside knowledge.
The flow of commit messages in a git log output should tell a story and certainly not be like this…

There are well established guidelines for writing good commit messages. The most commonly referenced note for writing good messages is available here:
Short (50 chars or less) summary of changes

More detailed explanatory text, if necessary.  Wrap it to
about 72 characters or so.  In some contexts, the first
line is treated as the subject of an email and the rest of
the text as the body.  The blank line separating the
summary from the body is critical (unless you omit the body
entirely); tools like rebase can get confused if you run
the two together.

Further paragraphs come after blank lines.

  - Bullet points are okay, too

  - Typically a hyphen or asterisk is used for the bullet,
    preceded by a single space, with blank lines in
    between, but conventions vary here

  - Use a hanging indent
It is particularly important to leave a blank line between the summary line and the body of the commit message.
An additional guideline used by some projects is that the summary line should be written such that it would complete the sentence “This change modifies the code/text to _____.”
Another similar view is presented here by Rob Pike (note that CL, for Change List, is equivalent here to Commit).
... make sure the CL descriptions are well-written and follow our conventions.

- first line has form "component: change"
- blank line follows
- description after first line is full sentences, in clean grammatical English
- purpose of CL is explained
- mechanism of CL is explained
- for performance-related CLs, benchmark information is presented

and so on.

The CL description is a public document that explains to the future what
has been done and why. Please think of it that way, not as a side note to
the code. In many ways it is as important as the code, and will often last
longer.
Also here with a deeper discussion.
As noted here, “if it seems difficult to summarize what your commit does, it may be because it includes several logical changes or bug fixes, and are better split up into several commits”.
It is worth reading this blog post about commit messages.
Pull requests
Now you have a branch which differs from your master branch just in the line you changed.
To merge that into the original repository you need to publish the change.
$ git push origin <branchname>
Where branch name is the name of the branch you created above.
This will output some lines showing the push’s progress. When it has completed navigate to your GitHub fork’s front page and you will see a banner with the name of the branch you pushed and green button to the right, “Compare & pull request”. Click the button (if there is no green button, you can click the button “New pull request” on the left of the page). This will take you to the “Open a pull reqest page” where you can add additional information and request a reviewer. Select a reviewer from the list, add some useful information to the body of the pull request form and check the subject and code changes are correct. Then click “Create pull request” and wait for a review.
To get a better feel of the pull request process, your first change will have some additional changes requested by the reviewer. Make the requested changes, stage and commit them and then push them as before (note the section on Etiquette below). Note that a pull request may have more than one commit and is attached to a branch rather than a commit - some projects prefer single commit pull requests and there are ways to make this happen in the GitHub web interface.
In a review, different teams use shorthand to communicate common ideas tersely. Here are a few common reviewer comments:
LGTM- looks good to meSGTM- sounds good to mePTAL- please take a looks/foo/bar/- replacefoowithbar; this is sed syntaxs/foo/bar/g- replacefoowithbarthroughout your entire change
Additionally there are author comments that should be understood by the reviewer:
WIP- work in progressDO NOT SUBMIT/DO NOT MERGE- PR is not ready or is just for discussionFixes #nnnn/Closes #nnnn- indicate to the reviewer (and GitHub) that the issue#nnnnshould be closed when the PR is mergedUpdates #nnnn- indicate to the reviewer that the PR is related to issue#nnnnand make GitHub link them
Once your pull request has been merged, delete the working branch.
$ git checkout master
$ git branch -D <branchname>
Then pull the most recent master branch from the upstream repository to check that your change is there.
Etiquette
Acknowledge reviewer comments, either to show that the request change has been made, to explain why you don’t think it should be, or at least acknowledge that a comment has been read by you.
Don’t commit other people’s work! (unless they cannot, they ask you to, or there is a general understand that this is OK for the project).
Remember that without visual and verbal cues, on-line communication can be easily misunderstood and review is potentially ego damaging, so be more polite than you would be in person, and be more charitable in the face of criticism.
Many projects have a document describing expectations of behaviour for people contributing to the project. If there is one, follow it.
Additional reading for GitHub
- https://help.github.com/categories/collaborating-with-issues-and-pull-requests/
- https://help.github.com/articles/about-pull-requests/
- https://help.github.com/articles/merging-a-pull-request/
- https://help.github.com/articles/closing-a-pull-request/
- https://help.github.com/articles/deleting-unused-branches/
- https://help.github.com/articles/about-pull-request-merges/